Why Are My Pork Ribs Tough? Easy Fix Guide
Tough pork ribs are a letdown after hours of cooking. The meat stays chewy and clings to the bone instead of pulling away cleanly. Low, slow heat is the fix.
Ribs are full of connective tissue that only softens with long, gentle cooking. High heat dries the outside before the inside ever turns tender. Collagen melts slowly, so time and moisture matter more than high heat. A foil wrap traps steam and keeps the meat juicy.
This guide covers prep, cooking, wrapping, and testing in order. If brisket is next, the dry brisket guide saves a dry cut with low slow heat.
Why Ribs Stay Tough

Ribs turn tender when collagen melts into rich gelatin. That change needs time and moist heat, not a blast from a hot oven. Fast cooking leaves the collagen firm and the meat chewy. Connective tissue runs through ribs and only softens with long, gentle cooking. High heat seizes the meat and leaves it chewy.
A dry surface also tightens and resists softening. In my experience, wrapping and low heat fix most tough ribs without any special equipment. Give the ribs time and low heat, and the tissue melts into juicy tenderness.
Pick Meaty Racks
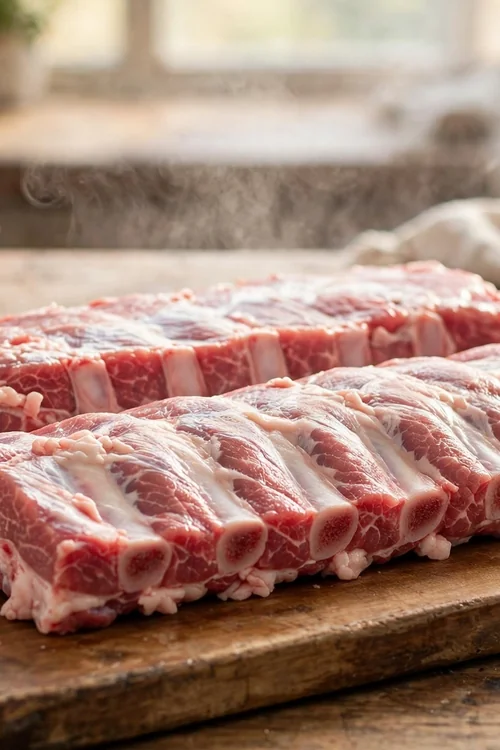
Meaty racks with even thickness cook most evenly. Look for racks with good marbling and a pink color. Avoid racks with very thin, bony sections. Choose racks with even meat cover and a pink color, avoiding bare spots where the bone shows through. A heavier rack usually means more meat.
- Choose racks of similar size for even cooking.
- Check for a thick meat layer over the bones.
- Skip racks with a strong off smell.
- Pat the racks dry before seasoning.
- Season generously on both sides.
Remove Membrane First

Quick Tip: Slide a butter knife under the membrane on the bone side and peel it off in one sheet. A paper towel gives extra grip. Removing it lets seasoning reach the meat and keeps ribs tender.
If the membrane tears, grip a fresh edge and keep pulling. A few small pieces left behind will not ruin the rack. Grip the membrane with a paper towel and pull it off in one steady sheet. If it tears, start a fresh edge and keep pulling until the bone side feels clean.
Cook Low And Slow

Common Mistake: Roasting ribs at 400 degrees to save time. The outside dries and tightens while the inside stays tough. The result is chewy ribs with a burnt crust.
The Fix: Cook at 275 degrees for two to three hours. Low heat melts collagen slowly and keeps the meat juicy. Let the rack rest ten minutes before slicing.
Use a covered pan or a foil tent for the first part of cooking. Trapped steam softens the meat faster than dry oven air. Low heat melts collagen slowly without drying the meat. Check tenderness with a toothpick, which should slide in with little resistance.
Wrap In Foil

What You Need:
- Heavy baking sheet or pan: A sturdy pan holds the racks flat.
- Aluminum foil: A tight wrap traps steam around the meat.
- Paper towels: Grip for removing the membrane.
- Tongs: Turn racks without piercing the meat.
- Brush: A brush spreads sauce evenly at the end.
Foil is the secret weapon for home ribs. A tight wrap turns the oven into a gentle steamer and finishes the job. Wrap the rack tightly so steam stays inside and the meat braises gently. Open the foil carefully at the end, since the steam is very hot.
Check Bend Test

Before: Ribs roasted uncovered at high heat for an hour came out chewy, dry, and stuck to the bone. Extra sauce could not hide the texture.
After: Ribs baked low, wrapped in foil, and finished with sauce pulled cleanly from the bone. The meat stayed juicy and tender.
The difference is time and moisture, not a better rub. Give collagen the hours it needs and the ribs reward you. Lift the rack with tongs and watch for a gentle bend with cracks on the surface. If it stays stiff, give it another thirty minutes at low heat.
Fix Dry Ribs

Do This:
- Cook low at 275 degrees.
- Wrap in foil for most of the cook.
- Test with the bend test before saucing.
- Sauce only in the last 15 minutes.
Avoid This:
- Do not cook at high heat.
- Do not sauce from the start.
- Do not cut ribs before cooking.
- Do not skip the resting step.
Sugary sauce burns during a long cook. Wait until the meat is tender, then glaze the racks for a short finish. Brush warm sauce over the ribs and rest them covered so the glaze soaks in. Slice between the bones only after resting, so the juices stay put.
Rescue Undercooked Ribs

Time Needed: About 2 to 3 hours plus resting.
Difficulty: Easy, mostly hands off.
Cost: Low, foil and a pan.
Best For: Weekend dinners and cookouts.
Start ribs earlier than you think you need to. Tender ribs hold well wrapped in foil, but tough ribs cannot be rushed. Return undercooked ribs to low heat wrapped in foil with a splash of broth. Check every thirty minutes until a toothpick slides in easily.
Sauce At End

If the ribs are already dry, brush them with warm broth or sauce, wrap tightly in foil, and return to a low oven for 30 minutes. The steam softens the meat and the sauce adds moisture back. Sauce at the end so the sugars caramelize without burning. Brush on two thin coats and let each one set.
Slice the ribs and serve with extra warm sauce on the side. Individual portions soak up sauce faster than a whole rack. Serve extra sauce on the side for anyone who wants more. Keep the rack resting a few minutes before slicing.
Rest Ribs Briefly

Resting lets the juices settle back into the meat instead of running onto the board. Ribs sliced straight from the oven lose moisture with every cut. A short rest under loose foil keeps the meat juicy and makes slicing cleaner.
- Move the rack to a wooden board.
- Tent the ribs loosely with foil, keeping it vented.
- Rest for 10 to 15 minutes.
- Slice between the bones with a sharp knife.
- Serve right away with warm sauce on the side.
Plan Better Ribs

Quick Tip: Rest ribs for 10 minutes after cooking. The juices settle back into the meat and the slices stay moist. Cutting too soon spills juice onto the board.
Keep ribs warm in a loose foil tent while resting. A tight wrap keeps steaming, and the bark can soften if left too long. Buy the ribs a day ahead and dry the surface well before seasoning. A steady oven and a timer beat rushing every time.
Conclusion
Tough pork ribs need time, moisture, and low heat. Remove the membrane, wrap in foil, cook at 275 degrees, and test with the bend test. Those habits give ribs that pull cleanly and stay juicy. For another slow cook rescue, the baked salmon guide keeps salmon moist and tender.
Start the ribs earlier than you think you need, since tender ribs hold well but tough ribs cannot be rushed. Keep the foil tight and the heat low. With time and steam on your side, the meat will pull cleanly from every bone.